When distance learning started back in March I felt helpless. Without my physical materials I didn’t know how I was going to engage my preschool special education students. For a few weeks I made it work, just using digital materials and activities. This was fine, but it didn’t feel like enough since I knew we were in this for a while.
When I saw Tiffany from @KraftyinKinder using the OSMO on her story I knew I had to look into it!! Tiffany was so sweet and helpful when I asked her questions about it. I told her I already owned an iPad stand from Amazon (linked here) so I wanted to try just getting the reflector. She told me it was worth a try, so that’s what I did.
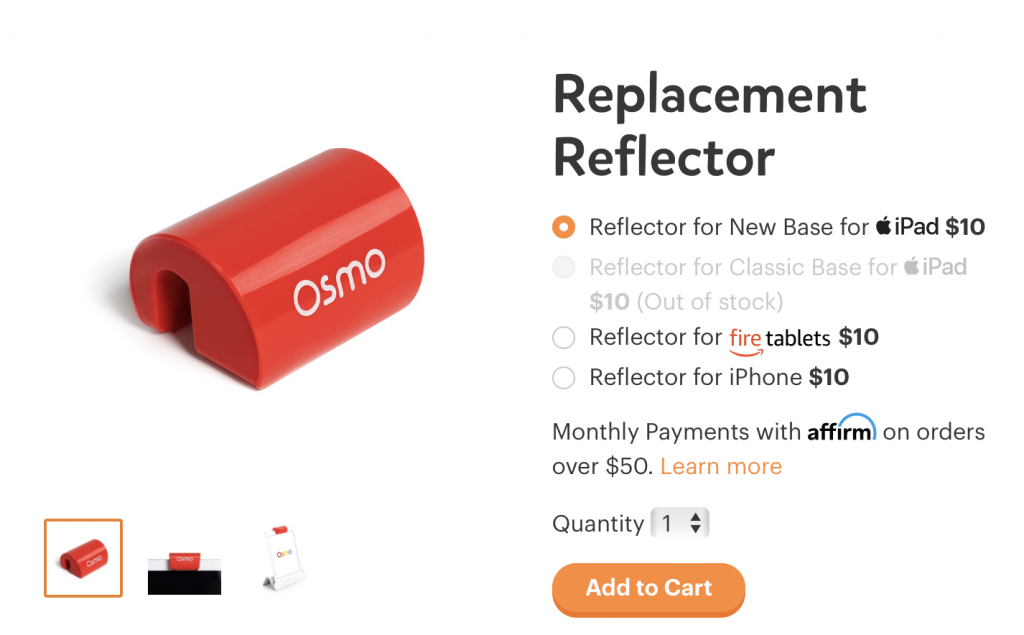
I only bought the $10 reflector replacement and I use my stand from amazon. $10!!! THAT IS IT!!!
Disclaimer:
- I do not know what iPads and computers this works with. Before purchasing the OSMO you should check that your iPad connects to your computer and that you can use QuickTime player to display what is on your iPad screen (directions below). If this works then you are probably ok to use the OSMO.
- I do not know much about OSMO and all of the kits and games they sell. You MIGHT probably need the OSMO base to use those. I truly don’t know. Read their website first and check their FAQ page.
- A follower told me this does not work with an iPad Pro!
My technology details:
iPad: iPad Air 3rd gen
Computer: MacBook Pro 2017 or 2018 (probably can’t get this one anymore…too old)
Projector: OSMO Reflector Replacement – the one that says “Reflector for New Base for iPad $10”
iPad Stand: Adjustable Tablet/Phone Stand
Adapter: USB C to USB Adapter
Wire: Apple Lightning to USB Cable
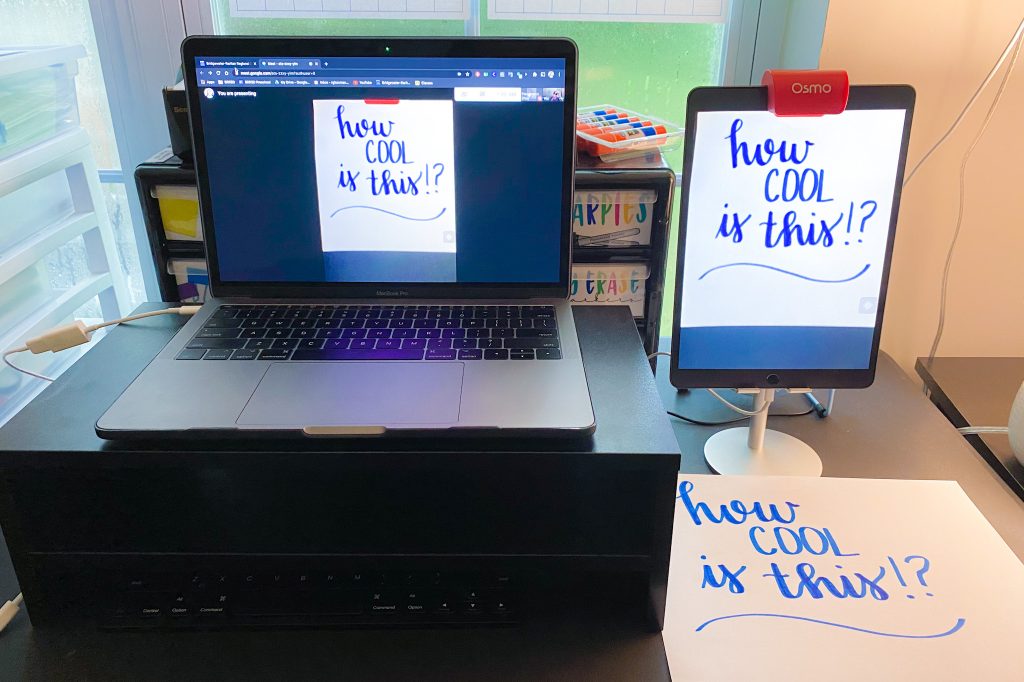
Now you’re probably thinking how does it work???
Let me tell you…
This method is JUST FOR MACS! Scroll for other computers…
- Download the free OSMO Projector App on your iPad
- Open the OSMO app on your iPad
- Put the iPad on the stand
- Place the OSMO on your iPad, over the front camera
- You should now be able to see the table on the iPad screen
- Plug in the wire and the adapter, connecting your computer to your iPad
- Open ‘finder’ on your Mac
- Double click ‘Applications’
- Double click ‘Quick Time Player’
- In the top left of your computer click ‘file’
- Click ‘new iMovie recording’
- Next to the record button there is a drop down arrow. Click iPad.
- There you go!
- If you want to screen share, just share the quick time player window
To share in a google meet:
- Open a google meet
- Click ‘present’
- Choose ‘share a window’
- Choose the Quick Time Player window
But Rachel, I’m a visual learner…
Well, same 🙂 So no worries! I walk through this step by step in my Instagram story highlights. In my OSMO highlight I show you the steps and in all of my Distance Learning highlights I show you how I have been using the OSMO.

The following 2 methods can work with a Mac OR a PC!
I own a Mac so I am no expert in what I am about to say. I recommend trying to connect your iPad to your computer first with these steps and THEN purchasing the OSMO and stand if this works!
- On your computer get the app ‘Team Viewer’
- On your iPad get the app: quick support from team viewer
- Go into quick support and it gives you an ID (9 digit code)
- On your computer, in team viewer, click ‘remote control’
- On your computer, under ‘control remote computer’ put in the ‘partner ID’, which is the 9-digit code from your iPad.
- On the computer click ‘connect’
- On the iPad click ‘Allow”
- Takes a second…then a screen comes up
- On your iPad click ‘start broadcast’
- Choose ‘start broadcast’
- It comes in portrait, but you can rotate by using the buttons on the bottom. You can also make it full screen using the button in the top left corner.
- When you screen share choose ‘iPad to screen share’
***The iPad should be able to do this WITHOUT a cord!
***You can record through team viewer (go to the top, extras, record, start)
If those steps didn’t work for you here is an alternative way (thanks to an insta follower)
1. Go to LetsView.com
2. Click on the download button
3. Download the app ‘Screen Mirroring: LetsView’ on your iPad
4. Once you have both of those downloaded open them up and on your iPad it’ll ask for a pin code. The code is on the top right corner on your laptop (see photo)
5. On your iPad press ‘try pin code’ and type in the code from the computer.
6. Once you input the code it will show how to turn on screen mirror your iPad.
7. In screen mirroring select ‘let’s view’
8. The screen mirroring will pop up on your computer screen
**To make it full screen choose the middle icon in the top right corner that says ‘more’. Choose ‘full screen’
–Then you open up Osmo Projector on your iPad!!!
-
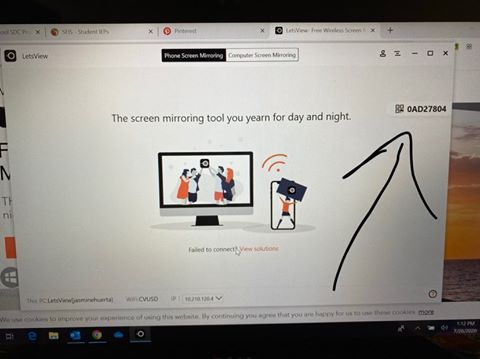
This is the code that your laptop will display to input on your iPad -
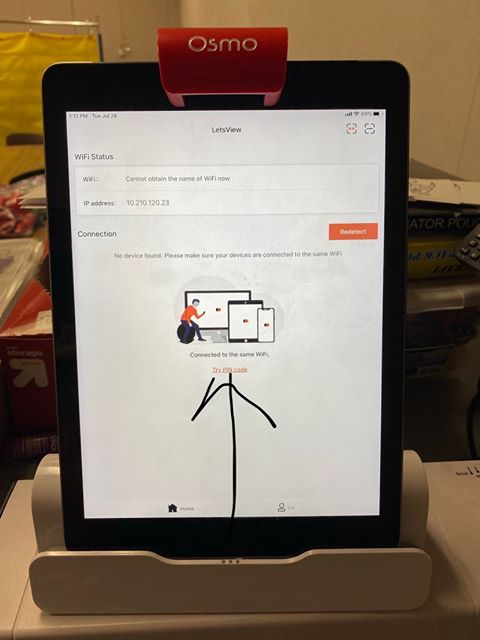
This is where you click to input the code on your iPad
From a super helpful follower who has older technology!
How to mirror your iPad’s screen to to your PC (IOS 9.3.5)
1. Go to www.5kplayer.com
2. Scroll down until you see the blue download button
3. Select a blue link from under the download button to match your computer’s operating system (32 or 64-bit)
4. Allow the app to make “changes to your device” if you get that pop up message. Then, the program will start to download.
5. Click the blue install button
6. Click the blue launch button
7. On your PC Click the grey button that says “DLNA/AirPlay”
Note: on the left side of the screen scroll down to the Airplay tab and make sure that the button is toggled you on for AirPlay service, and that the status says running.
8. On your iPad, swipe up from the bottom of your screen until the control menu pops up. Look for the AirPlay button.
9. When the AirPlay button appears, click it then select the option for “5KPlayer-DESKTOP…” AND toggle on the option for mirroring!
Now you will see your iPad screen on your PC 🙂
From another amazing follower: How to use OSMO and ZOOM easily!
Step 1: Connect your iPad to your Mac (I have to use a USB-C cable)
Step 2: Open Zoom and click share screen
Step 3: In the basic share options click on “iphone/iPad via Cable”
Step 4: A message will appear asking you to “trust” this device if it is your first time doing this
Step 5: Open the Osmo projector app on your iPad
Step 6: Enjoy!
Questions from Instagram:
Q: What exactly does it do?
A: The little red piece I buy reflects whatever is on my table. Easiest. $10 EVER.
Q: Where to buy and what to buy?
A: I JUST got the reflector replacement from OSMO: https://www.playosmo.com/en/shopping-edu/accessories
Q: Why don’t you use the OSMO base?
A: The OSMO base actually tilts the iPad back slightly, whereas my stand makes the iPad stand straight up.
Q: Did your district or school pay for it?
A: No. I previously owned my Mac, iPad and iPad stand (purchased myself). I purchased the $10 reflector replacement from Osmo myself.
Q: I read on the app reviews that it can be blurry…have you experienced this?
A: Yes. A little bit. It is definitely not 100% clear, but I teach 3-5 year olds and we have been TOTALLY fine with it!!!
Q: What device does it work with?
A: Check out the FAQ page on OSMO’s site for more information about this: https://www.playosmo.com/en/faq/
Q: How do you take data while using the OSMO?
A: I keep a paper and pen nearby to take anecdotal notes.
Q: What app do you need?
A: On your iPad get the FREE Osmo Projector app. It can also just work with the camera app.
Q: Have you used this to model writing?
A: No, but I am sure it would work well.
I hope this was helpful!!! Please let me know if you have any questions by messaging me on Instagram.
LOVING THE IDEA OF AN OSMO?? Check out my other blog post about the OSMO where I show you everything I use it for!
